• Home
  • Categories
  • Video Tutorials
    • Angular 5
  • News
  • About us
  • Contact us
  • Login
test
Code4Developers

Code4Developers

Code4Developers
  • Home
  • Categories
  • Video Tutorials
    • Angular 5
  • News
  • About us
  • Contact us
  • Login
  • MongoDB
  • JavaScript

Install MongoDB on Mac

  • Arif Khoja
  • October 19, 2019
  • 2 minute read
Total
0
Shares
0
0
0

MongoDb on MAC

In this quick tutorial, I am going to be showing you how to install MongoDB with the 4 STEPS on your MAC.

    • Install Brew
    • Install MongoDB
    • Run Mongo Server
    • Make A query To MongoDo

STEP #1 Install Brew

Open up your terminal by going to Applications -> Utilities -> Terminal and Copy and Paste the following command into the Terminal. Hit enter to begin installing brew.

/usr/bin/ruby -e "$(curl -fsSL https://raw.githubusercontent.com/Homebrew/install/master/install)"

STEP #2 Install MongoDB

Once Brew is installed, it is time to install MongoDB by issuing the following command on the Terminal:

brew install mongodb

Next, create a folder by typing the following command:

sudo mkdir -p /data/db

You will be prompted to enter your computer password. The below command will take you to the folder path that contains all of the mongo server files.

sudo chown yourhomedirectoryname /data/db

That’s it! At this point, you have successfully installed MongoDB on your Mac!

Now, open up two Terminal Windows, one is to run MongoDB Server and other one is Mongo Shell where you can write  write Mongo Queries.

STEP #3 Run Mongo Server

Type the command below to start the server.

mongod

Now, the server is running. If you want to stop the server, you can use the Control + C  keyboard shortcut or close the Terminal window.

STEP #4 Make A Query To MongoDB

Once the server is up and running, open up a new tab in the Terminal window and type the command below that will give you the mongo shell in which you can write mongo queries.

mongo

If you want to see all the databases, use the following command.

show dbs

Sometimes, writing queries on the Mongo Shell would be really hard because there is no syntax highlight and it becomes tedious when you execute big queries.

Luckily, I recently found a mac application called MongoBooster  (FREE) that will replace the mongo shell Terminal window. Remember, you must keep the server running.

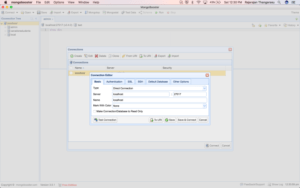
Once you install MongoBooster, you need to connect to the server by going to File→ Connect→ Create and add your server information.

The server has to be “localhost” and the port is “27017” which is a default Mongo Server port. See the screenshot below:

ServerConfiguration

Once you have successfully connected to the server via MongoBooster, you can start writing Mongo queries in the Mongo Shell which is nice like below.

Mongo Shell

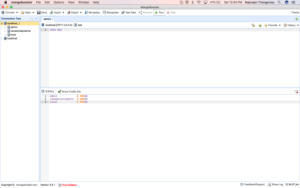
All you have to do is write some mongo queries on the top window and click RUN button and you can see the result on bottom window.

I really enjoy working with MongoBooster as it gives me code completion and syntax highlight.

Thank You for reading…

Arif Khoja
Arif Khoja

Arif Khoja is a Developer. He is a Javascript Enthusiatic who loves logical programming and has first hand experience in building a cutting edge internet product using Angular. He is also an open source freak and keen about learning and sharing. He writes Javascript both frontend and backend. He loves learning and sharing tech all the time. He also has a hands on experience in SEO and writes articles about latest emerging technologies.

Views: 2,501

Share this:

  • Click to share on Facebook (Opens in new window) Facebook
  • Click to share on WhatsApp (Opens in new window) WhatsApp
  • Click to share on LinkedIn (Opens in new window) LinkedIn
  • Click to share on X (Opens in new window) X
  • Click to share on Pinterest (Opens in new window) Pinterest
  • Click to email a link to a friend (Opens in new window) Email
  • Click to print (Opens in new window) Print

Like this:

Like Loading...

Related Posts

Total
0
Shares
Share 0
Tweet 0
Pin it 0

Leave a ReplyCancel reply

Subscribe to Website via Email

Enter your email address to subscribe to this blog and receive notifications of new posts by email.

Recent Posts
  • Getting Started with AWS Step Functions: Orchestration Made Simple

    Getting Started with AWS Step Functions: Orchestration Made Simple

    2 months ago
  • React Hooks Guide: Top Tips for Optimizing Performance in Your React Applications

    React Hooks Guide: Top Tips for Optimizing Performance in Your React Applications

    2 years ago
  • Demystifying JavaScript Tree Shaking: Boosting Performance and Reducing Bundle Size

    Demystifying JavaScript Tree Shaking: Boosting Performance and Reducing Bundle Size

    2 years ago
  • Unlocking the Power of React Hooks: A Comprehensive Guide with Examples

    Unlocking the Power of React Hooks: A Comprehensive Guide with Examples

    2 years ago
  • Celebrating a Decade of Phenomenal Growth: Insights and Reflections on 10 Years of Software Engineering

    Celebrating a Decade of Phenomenal Growth: Insights and Reflections on 10 Years of Software Engineering

    2 years ago
  • Angular Custom Elements: Creating Reusable Components with Angular

    Angular Custom Elements: Creating Reusable Components with Angular

    3 years ago
  • Connect Firebase Realtime NoSQL Database with Angular App from Scratch

    Connect Firebase Realtime NoSQL Database with Angular App from Scratch

    5 years ago
  • How to Build an Inclusive Esports Community

    How to Build an Inclusive Esports Community

    5 years ago
  • Best Digital Icebreakers

    Best Digital Icebreakers

    5 years ago
  • Email alerts when a docker container stopped in AWS ECS CLUSTER

    Email alerts when a docker container stopped in AWS ECS CLUSTER

    5 years ago
Subscribe to Website via Email

Enter your email address to subscribe to this website and receive notifications of new posts by email.

Featured Posts
  • javascript 1
    Spread syntax (three dots) in JavaScript
    • March 21, 2018
  • Angular 2
    Angular 6 CRUD – Part 1: Project Setup, Routing, Service
    • May 9, 2018
  • javascript 3
    Local Storage and Session Storage
    • May 22, 2017
  • Angular 4
    Angular 4 Project Structure
    • June 18, 2017
  • AWS 5
    Email alerts when a docker container stopped in AWS ECS CLUSTER
    • July 24, 2020
Code4Developers
Learning is never ending process

Input your search keywords and press Enter.


Loading Comments...
 

    %d